Friday 23rd
The time – 7pm
The place – Torridon Community Centre – our base for the weekend, with accommodation at the hostel nearby.
The people – our team of trusted rigging gurus & self-confessed geeks Stuart, Shaun, Big John and the not-so big John who were going to be enlightening us over the weekend into the wonderful world of tensioned line rescue systems.
The punters – a great turn-out of around 22 keen beans from Aberdeen MRT, Torridon MRT, Skye MRT, HebSAR, Glencoe MRT and the RAF. A real mixed bunch with varying backgrounds, skills and experience to share. It was going to be a great weekend.
So intros over, tea drunk and IT problems resolved (thanks Ryan!), we were given a wee course overview and intro into some of the considerations when setting up a tensioned line rescue system. It’s a whole new language! As a relative newbie to the team with no climbing background, I had a lot of learning to do. So just a wee taster on the first night of what lay ahead – it sounded technical. I would definitely be needing a cup of coffee or three in the morning!
Saturday 24th
Back to Basics
We all assembled with our kit to look at what everyone carries on their harness (I was painfully aware of a lack of jangling on mine!!). The aim of the session was to have an awareness of the limitations of the kit you are carrying in terms of loading (it’s Newton rating) – we looked at karabiners, slings & lanyards and were also introduced to a couple of new lanyards on the market with a discussion of their pros and cons.
Petzl ID & Prusiks
Following on from that, Stuart ran a session outside (we were thankful for a wee breeze to keep the midges away) introducing us to the Petzl ID. We had trained with these devices in the Torridon team in the months running up to the course, so it was a familiar piece of kit. We all had a go at setting it up and using it to feed out, take in and lock off. Then onto prusiks (the spelling has always been a mystery!) and their use in tensioned line systems as releasable rope grabs in case of rope failure.
Vector Forces
Here comes the maths & physics (deep breath) – another practical session (thank goodness!) looking at anchor angles and the relative load on the rope and anchor. With a person at either end of the rope (the anchors) and one in the middle (the load), it was amazing to feel the force change at each different position as the angle of the anchors changed. This illustrated perfectly the effect of vector forces and the need to understand and consider these in a rigging environment. I wasn’t one of the science minded folks with their notebooks out writing down the detail, but in essence, the greater the angle, the larger the multiplication of the force. I had a look online to refresh my memory of the figures and found this webpage really helpful – www.ropebook.com/information/vector-forces. Following on from this we then discussed the importance of good anchor selection and choosing appropriate anchors for the anticipated load. Not always easy in the great outdoors!
Petzl Paw Rigging Plate
More good use of the Community Centre Railings as we take it in turns to set up and adjust anchors using a Petzl Paw, with consideration to VIE – Vector, Independence & Equal – again something that we had familiarised ourselves with in our Level 1 refresher a few weeks earlier, which was a great help. It was clear to see how easy it was to adjust the anchors with the rigging plate bringing everything together.
Afternoon at Annat
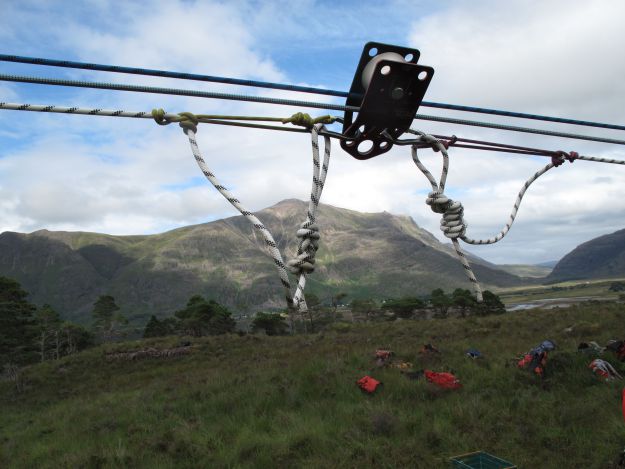
So after a mind-expanding morning packed full of great practical sessions, time to put some of it into practice in a more realistic setting. So it’s over to the other side of the loch at Annat, where there is a demonstration of how to set up a tensioned line rescue system. Emphasis is placed on being organised in our approach and laying out all the kit required, so it is ordered (they suggested a bright mat may help with this). In systems where multiple ropes are used, the importance of having different coloured ropes for clarity was also clear. We watch through our midge nets as they select anchors (I am introduced to the ‘BFK’!), set up the ropes and tension the line (the same people should be used for tensioning so that the same force is exerted on each rope each time). We all then have a go at dismantling and setting up the same system. This is where all the morning’s learning really comes together, seeing how everything fits together to reach the end result.
Satisfied that we have a solid working knowledge of our newfound skills, we move further up the road to a small gorge to scale things up once more. The task here – to set up a tensioned line rescue system across the gorge and send a rescuer down in to the gorge and back up again (all being well!). In our respective groups we are all given specific tasks – on a bigger operation such as this, the importance of having someone who is directing overall becomes really clear. Communication across the gorge also becomes an issue – something that we failed to consider at the outset, so a good learning point. We survived the midges and rescuer Arjan managed to avoid getting wet, so a great outcome and end to the first day.
Back to the centre for a quick debrief and session on ropes (static, semi-static, uses, pros and cons, recent developments) and a practical demonstration of rope strength – we dangle an unsuspecting Stuart from a rope a foot or so off the ground and watch his horrified face as Shaun starts to cut into the sheath of the rope and through each cord. Although the rope starts to stretch once a few cords have been cut, it still holds him on one main strand of nylon! He’s definitely needing a pint after that ordeal, so it’s off to the pub for one or two (well it’d be rude not to!) 😉
Sunday 25th
Another gorgeous dry day, so we take advantage of the stunning weather, midge-proof up and head up the lower slopes of Liathach at the back of the Community Centre. We start off with a session on spikes and their use as anchors in terrain where more traditional anchors are hard to find. Then it’s off up the hill to set up a tensioned line using human anchors at the bottom to bring a stretcher down over rough ground. I learn another new knot – the Alpine butterfly – as part of the human anchor at the bottom and we safely bring down the stretcher and casualty. Despite the time taken to set up the line, it was a much quicker alternative to carrying the stretcher over such tricky ground. We all drool over the RAF titanium stretcher for a while (half as heavy as a MacInnes!), then gear up and head off to our main venue for today – the Alligin gorge.
Here all our learning is put to the test as we work in two teams to set up a Scottish Reeve across the gorge and send stretcher and attendant out from one side, down into the gorge, back up again and out the other side. We take it in turns to rig and dismantle either side of the gorge. Communication is better today, with team radios in use and a spotter at the edge of the gorge. It’s great to see all our learning over the past couple of days coming together. The following short movies are good examples of the Norwegian Reeve www.youtube.com/watch?v=buXamnYfUm0 and English Reeve www.youtube.com/watch?v=ww2yqJLm1PU.
So the weekend is nearly over – just time for a final cup of tea and quick chat from Tina Hartnell about her role as a helicopter dispatcher for the RAF and how important good relations are between MRT and the RAF for successful outcomes in rescue situations. A final chance for questions and clarifications and then we all make the journey home (just a wee walk down the road for me!). What a fantastic weekend. Thanks to Shaun, Stuart and the 2 johns for their clear instruction, their passion and enthusiasm and their patience! Thanks also to Jim for organising the weekend, to the hostel for providing the accommodation and to whoever organised such fantastic weather for us all to enjoy Torridon in all its glory.
For some great photos of our exploits thanks to Jim, please go to www.flickr.com/photos/torridonmrt/
Emily John


Leave a Reply
You must be logged in to post a comment.